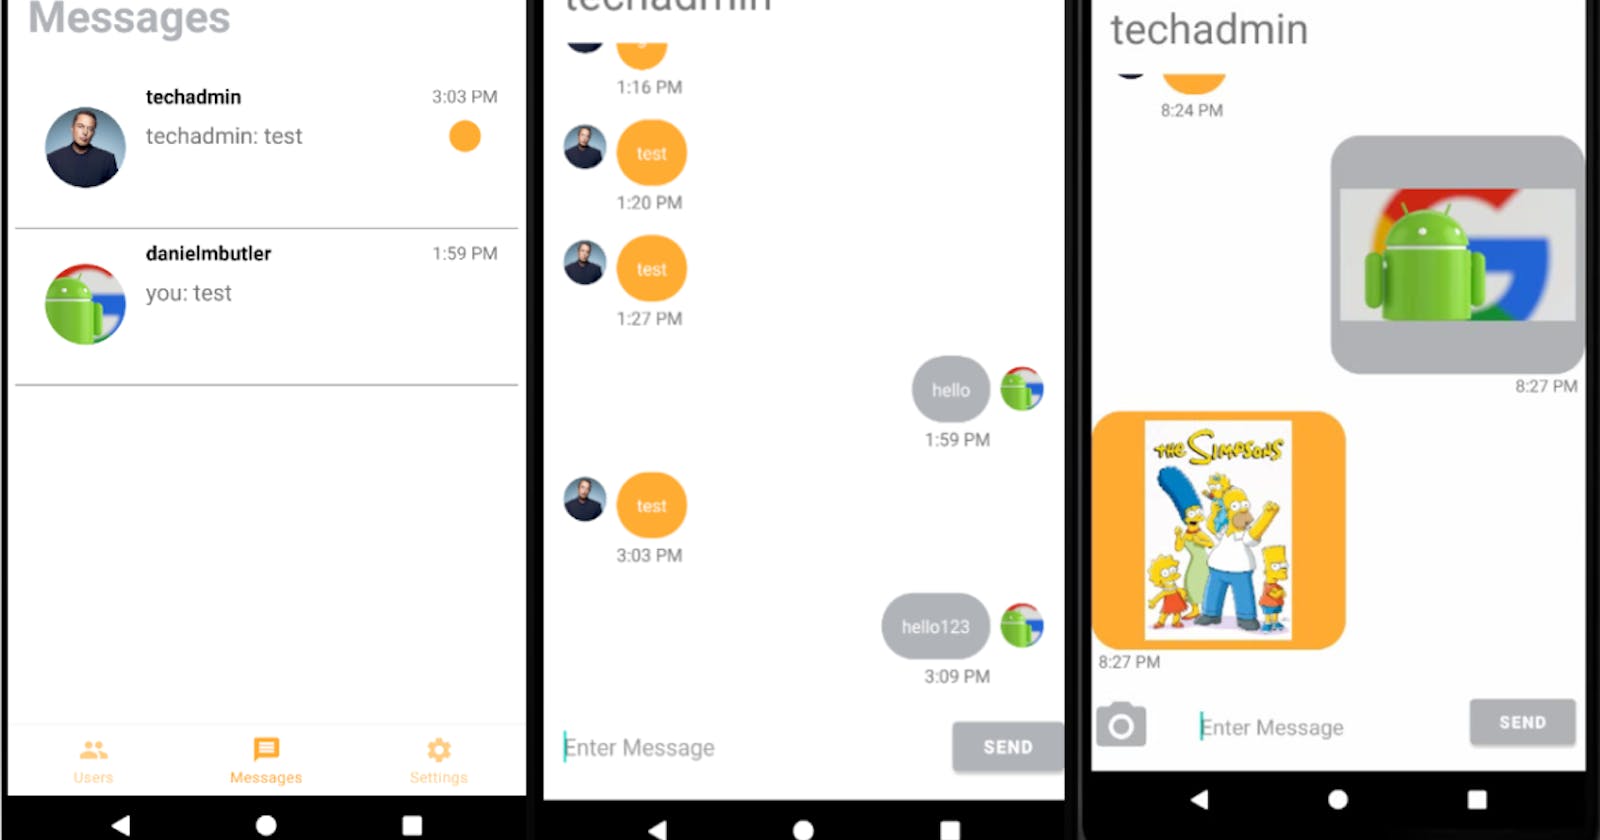
After building a few Android Apps utilizing Google's Firebase Realtime DB, I thought it would be a good idea to try out Amazon's Amplify platform to see what the competition has to offer. My goal was to build a chat app with real-time messaging, user profiles, and picture messaging, I was able to accomplish the goal with very few roadblocks, and I'm pretty pleased with the outcome, if you would like to skip straight to the code you can check out the Github link below but if you would like to learn about the project in detail then stick around. https://github.com/danielmbutler/AWS_Android_Messenger_App
This is not a full guide on how to build the app but provides further insight than my Github ReadMe file.
Amplify is a suite of products that can be utilized by developers in order to build apps, in my project I used the below products.
AWS Cognito - User Authentication AWS S3 - Storage of user profile Images AWS Datastore - Real-time database for chat data
App Architecture
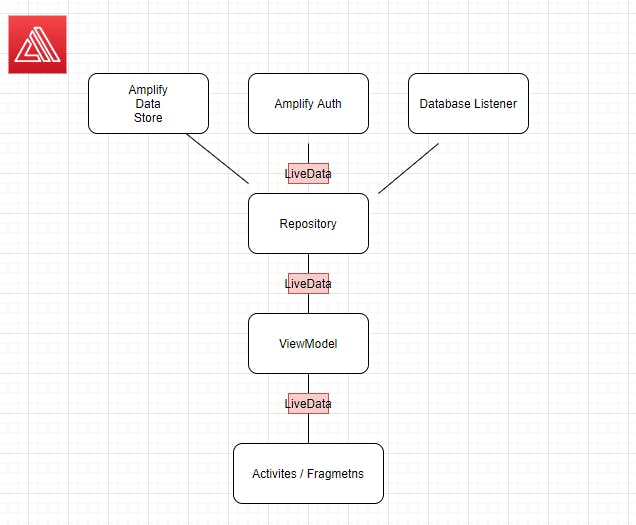
I am using MVVM architecture with LiveData, so our view models will query the repository and then the repository will return LiveData objects from either of the 3 remote data classes, this will then get passed back to our observers in the activities and fragments which will update the UI. The remote data classes are listed below with their use case.
-AmplifyAuth: class reserved for user auth actions (sign in, sign up, check session, etc)
-AmplifyDatastore: class reserved for datastore operations (retrieve messages, retrieve users, sending messages)
-DatabaseListener: class reserved for functions that observe live changes in the real-time DB, (we want to be notified when new messages come in so we have to set up these observers)
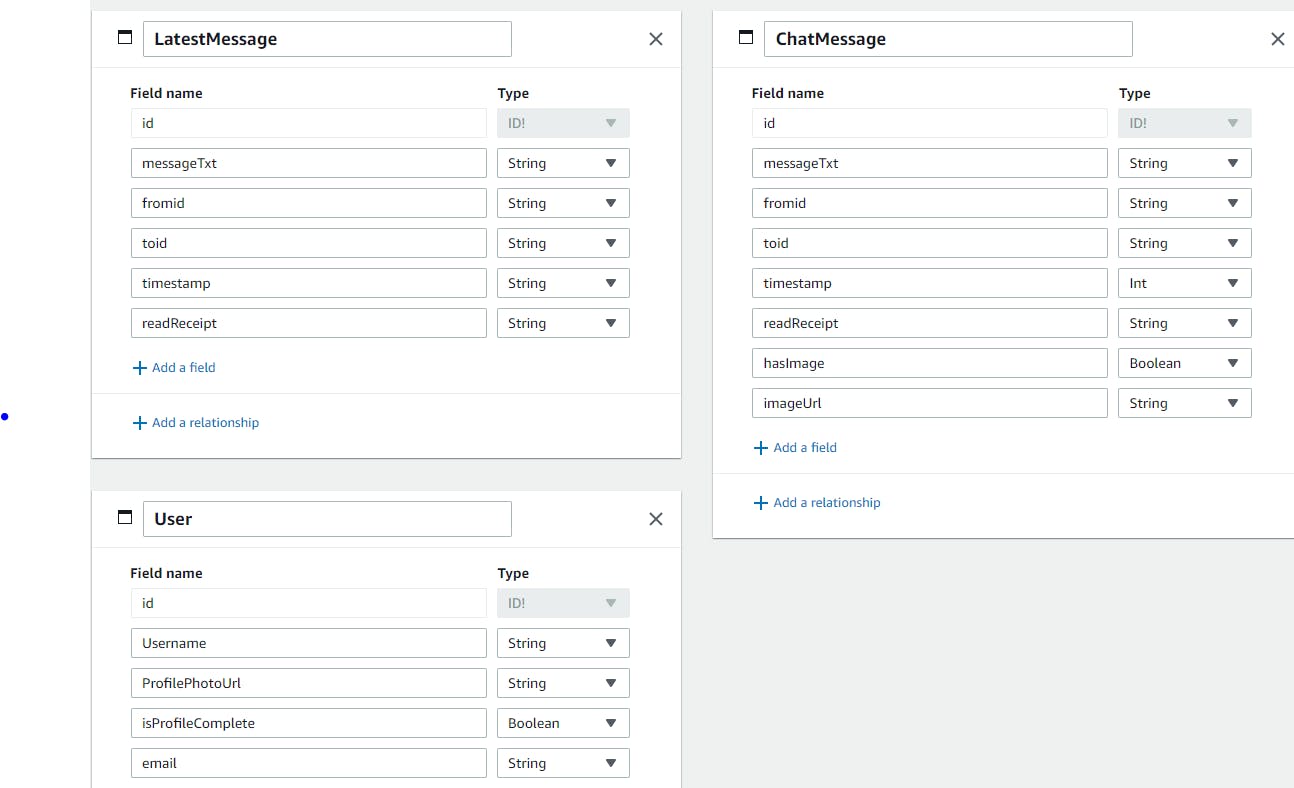
The first step was deciding on the data models for the real-time db I have chosen the 3 below, the user model will be used to store our user data, chat message for the messages between our users, and the latest message for the messages that will be shown on the messages screen, the idea is to only have 1 latest message per conversation.
data models
The next step is setting up Amplify in our android app, deploying an application via Amplify is pretty simple we just need to follow the docs provided by AWS, you just require an AWS Account to get started.
docs.amplify.aws/lib/project-setup/create-a..
once the "getting started" steps are completed, we should have an Amplify Application class which we can use to initialize our Amplify components like below
@HiltAndroidApp
class AmplifyApp: Application(){

    // initialize and setup Amplify Comms

    override fun onCreate() {
        super.onCreate()
        try {
            Amplify.addPlugin(AWSCognitoAuthPlugin())
            Amplify.addPlugin(AWSDataStorePlugin())
            Amplify.addPlugin(AWSS3StoragePlugin())
            Amplify.addPlugin(AWSApiPlugin()) //remotebackend setup
            Amplify.configure(applicationContext)
            Log.i("MyAmplifyApp", "Initialized Amplify")
        } catch (error: AmplifyException) {
            Log.e("MyAmplifyApp", "Could not initialize Amplify", error)
        }
    }
}
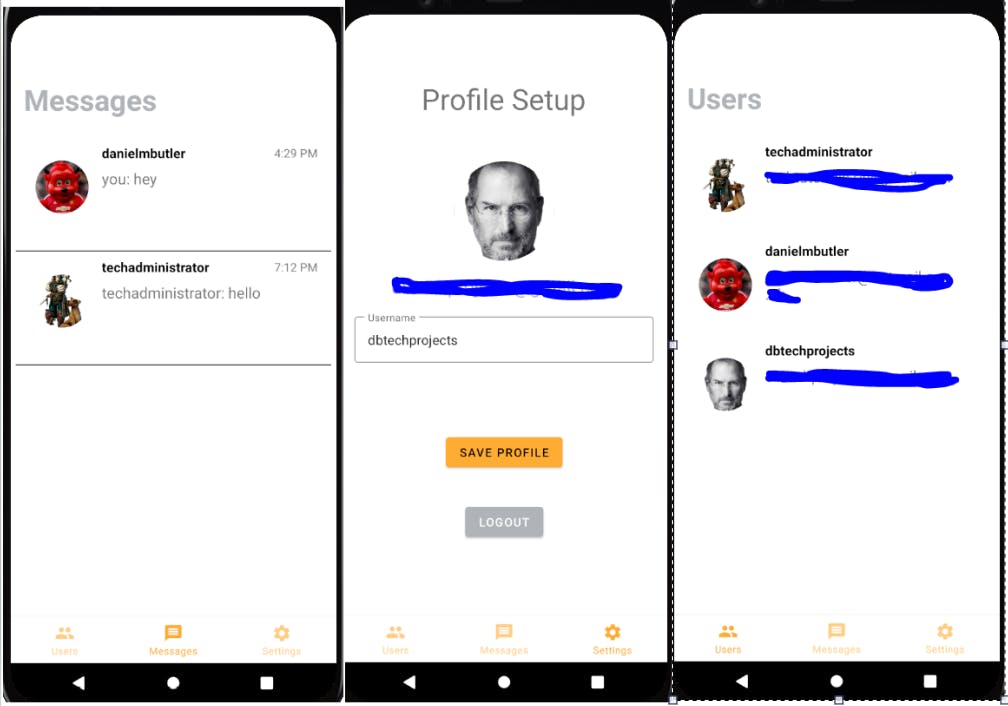
Once we have Amplify initialized we are ready to begin building this app, I created my basic fragment and activity layouts, for registering, sign-in, chat, users directory, and profile page.
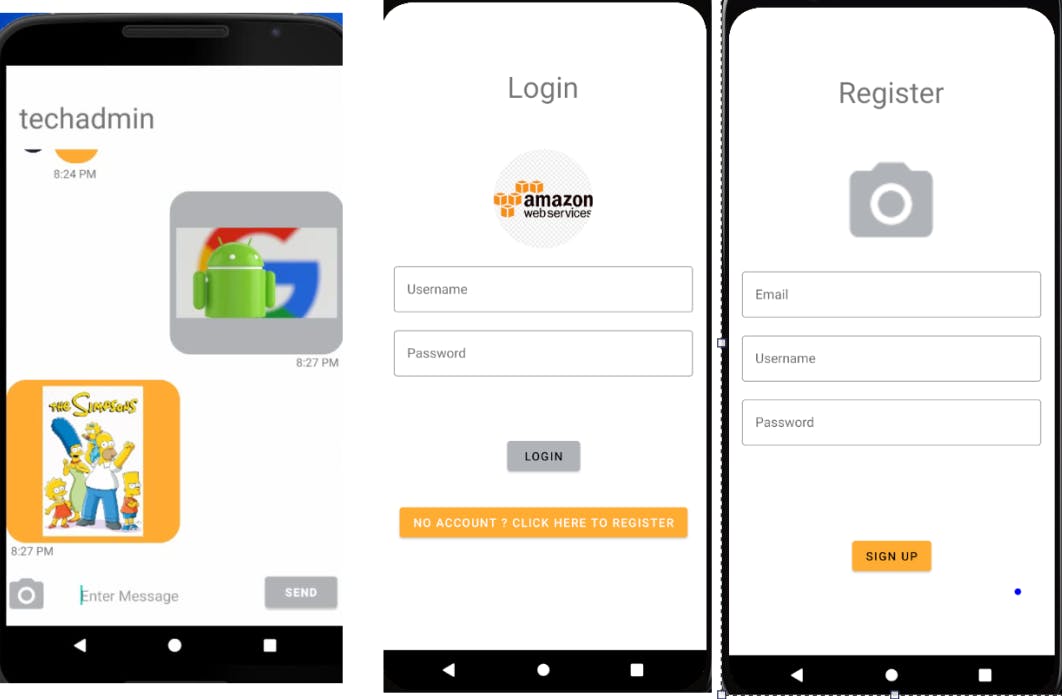
Registering and creating users
In order to register users we need to use the Amplify SDK provided by AWS, my implementations of these functions are below and are placed in my AmplifyAuth class.
Once a user is signed up, we will also create a user object in the real-time database, this user will then appear in the 'users fragment' and will be ready to participate in messaging.
// Activity


                // SignUp User

                viewModel.signUpUser(
                    RegisterTxtEmailEditTxt.text.toString(),
                    RegisterTxtUsernameEditTXT.text.toString(),
                    RegisterTxtPasswordEditTxt.text.toString()
                )

                // Observe result
               viewModel.getSignUpValue().observe(this, Observer { result ->
                   if (success){
                         //updateui
                      }

                })

//Viewmodel

// LiveDataGetters

    fun getSignUpValue(): LiveData<Boolean>{
        return repository.getSignUpValue()
    }

    fun getValidationCodeValue(): LiveData<Boolean>{
        return repository.getValidationCodeCheckValue()
    }

    fun getUserCreatedValue(): MutableLiveData<Boolean> {
        return repository.getUserCreatedValue()
    }

    // Execution Functions


    fun signUpUser(email: String, username: String, password: String){
        viewModelScope.launch(Dispatchers.IO) {
            repository.signUpUser(email,username,password)
        }
    }

    fun validatecode(username: String, code: String){
        viewModelScope.launch(Dispatchers.IO) {
            repository.validateConfirmationCode(username, code)
        }
    }

    fun createUser(username: String, email: String){
        viewModelScope.launch(Dispatchers.IO) {
            repository.createUser(username, email)
        }
    }
//repository


    fun getUserCreatedValue(): MutableLiveData<Boolean>{
        return auth.UserCreated
    }

    fun getSignUpValue(): MutableLiveData<Boolean>{
        return auth.SignupValue
    }

    fun getValidationCodeCheckValue(): MutableLiveData<Boolean>{
        return auth.ConfirmationCode
    }

    fun createUser(username: String, email: String) = auth.CreateUser(username, email)

    fun signUpUser(email: String, username: String, password: String) = auth.Signup(email,username,password)

    fun validateConfirmationCode(username: String, code: String) = auth.ValidateCode(username, code)


// Amplify Auth

    val SignupValue                    : MutableLiveData<Boolean> = MutableLiveData()
    val ConfirmationCode               : MutableLiveData<Boolean> = MutableLiveData()
    val UserCreated                    : MutableLiveData<Boolean> = MutableLiveData()

 fun Signup(email: String, Username: String, Password: String) {

        Log.d("Register Activity", "email: $email, username: $Username, Password: $Password")

        val options = AuthSignUpOptions.builder()
            .userAttribute(AuthUserAttributeKey.email(), email)
            .build()

        try {
            val result =
                Amplify.Auth.signUp(email, Password, options, this::onSuccess, this::SignUpError)
            Log.i(TAG, "Result: $result")
            println(result)
        } catch (error: AuthException) {
            Log.e(TAG, "Sign up failed", error)
        }
    }


    private fun onSuccess(authSignUpResult: AuthSignUpResult) {
        Log.d(TAG, "Sign up success")
        GlobalScope.launch(Dispatchers.Main) {
            SignupValue.setValue(true)
        }


    }

    private fun SignUpError(e: AuthException) {
        Log.e(TAG, "Error: ${e.message}")
        GlobalScope.launch(Dispatchers.Main) {
            SignupValue.setValue(false)
            println(SignupValue.value)
        }
        println(SignupValue.value)


    }

  fun ValidateCode(email: String, code: String)  {

        try {

            val result = Amplify.Auth.confirmSignUp(
                email,
                code,
                this::onConfirmationCodeSuccess,
                this::onConfirmationCodeError
            )
            Log.i(TAG, "Result: $result")
        } catch (error: AuthException) {
            Log.e(TAG, "Failed to confirm signup", error)
        }


    }
    private fun onConfirmationCodeSuccess(signUpResult: AuthSignUpResult) {
        Log.d(TAG, "Confirmation Code success")
        GlobalScope.launch(Dispatchers.Main) {
            ConfirmationCode.setValue(true)

        }


    }

    private fun onConfirmationCodeError(e: AuthException) {
        Log.e(TAG, "Error: ${e.message}")
        GlobalScope.launch(Dispatchers.Main) {
            ConfirmationCode.setValue(false)

        }

    }


    fun CreateUser(email: String, Username: String) {

        val user = User.builder()
            .id(java.util.UUID.randomUUID().toString())
            .email(email)
            .isProfileComplete(false)
            .username(Username)
            .profilePhotoUrl("")
            .build()

        try {
            Amplify.DataStore.save(user, this::onCreateUserSuccess, this::onCreateUserFailure)
            Log.i(TAG, "Saved a new user successfully")
        } catch (error: DataStoreException) {
            Log.e(TAG, "Error saving user", error)
        }

    }
    private fun onCreateUserSuccess(dataStoreItemChange: DataStoreItemChange<User>){
        Log.d(TAG, "UserCreated success")
        GlobalScope.launch(Dispatchers.Main) {
            UserCreated.setValue(true)

        }


    }

    private fun onCreateUserFailure(dataStoreException: DataStoreException) {
        Log.d(TAG, "UserCreated failure: ${dataStoreException.message}")
        GlobalScope.launch(Dispatchers.Main) {
            UserCreated.setValue(false)

        }
    }

    }
Sending Messages
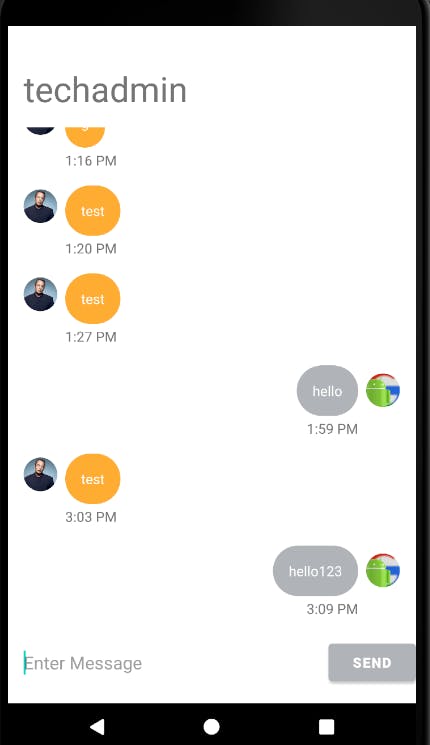
When a conversation is clicked on, the chat log activity will open, from here we can send messages to a user.
//Activity

  private fun performSendMessage() {


        val text = editText_chatlog.text.toString()
        val user = intent.getParcelableExtra<LocalUserModel>("user")
        val fromId = fromUser!!.id // current logged in user
        val toId = user!!.id

        //message details
        Log.d("ChatActivity", "text: $text, user: $user, fromid: $fromId, toid: $toId")

        // send to Aws

            viewModel.SendMessage(messagetxt = text, fromid = fromId, toid = toId!! )
            // add chat item to chat if user is not logged in user (creates duplicates)

            if (fromId != toId){
                adapter.add(
                    ChatToItem(
                        text,
                        (System.currentTimeMillis() / 1000).toString(),
                        fromUser!!,
                        this@ChatLogActivity
                    )
                )
                // scroll to bottom
                recyclerview_chatlog.scrollToPosition(adapter.itemCount - 1)
            }

        editText_chatlog.setText("")

    }


//ViewModel

  fun SendMessage(messagetxt: String, fromid: String, toid: String){
         viewModelScope.launch {
             repository.sendMessage(messagetxt, fromid, toid)
             repository.setLatestMessage(messagetxt, fromid, toid) // will explain later
         }
    }

//Repository

fun sendMessage(messagetxt: String, fromid: String, toid: String) = db.sendMessage(fromid = fromid, toid = toid, messagetext = messagetxt)

// Auth Class

  fun sendMessage(
        messagetext: String,
        fromid: String,
        toid: String,
    ){

        Log.d(TAG, "message received setting message")

            val chatMessage = ChatMessage.builder()
                .messageTxt(messagetext)
                .fromid(fromid)
                .toid(toid)
                .readReceipt("unread")
                .timestamp((System.currentTimeMillis() / 1000).toInt())
                .build()

            try {
                Amplify.DataStore.save(chatMessage, this::onSuccess, this::onFailure)
                Log.i("MyAmplifyApp", "Saved a new post successfully")
            } catch (error: DataStoreException) {
                Log.e("MyAmplifyApp", "Error saving post", error)
            }


    }
When we send a message, a 'chat message' object will be created with the 'touser' and 'fromuser' ids for this conversation and also the other relevant information such as timestamp and the text of the message.
In order to receive messages, we need to set up a listener on the real-time database to observe any new messages where the 'touser' id is equal to the id of the currently logged-in user. This listener is then observed from the repository and is passed down to our ViewModel and Activity using LiveData.
 val message          : MutableLiveData<ChatMessage> = MutableLiveData()

    fun listenformessages(toid: String, Fromid: String){

            Amplify.DataStore.observe(
                ChatMessage::class.java,
                { Log.i("MyAmplifyApp", "Observation began") },
                {
                    // only listen for incoming messages sent to the logged in user
                    if (it.item().toid == Fromid && it.item().fromid == toid){
                        Log.i("MyAmplifyApp", "Message: ${it.item().messageTxt}")

                        GlobalScope.launch(Dispatchers.Main) {
                            val chatMessage = it.item()

                            Log.d("ChatlogActivity", chatMessage.messageTxt!!)
                            message.postValue(chatMessage)

                        }
                    }

                },
                { Log.e("ChatLog-Listen", "Observation failed", it) },
                { Log.i("ChatLog-Listen", "Observation complete") }
            )
        }
Once a new message is observed in the activity it will then get added to the recycler view and displayed on the screen. In order to display the different message types, I created different layout files and used GroupieViewHolder to handle the different view types, in total we have 4 views.
ChatFromItem
ChatToItem
ChatFromImageItem
ChatToImageItem
In order to tell the activity which views to use, we simply check the details for the chat message model like below.
  // setup observer for livedata

  viewModel.listenForChatMessages().observe(this, {
                setuprv(it)
                latestchatmessage = it
            })

// fromuser is the currently loggedin user
private fun setuprv(chatMessage: ChatMessage){

        if (chatMessage.fromid == fromUser!!.id) {
            if (chatMessage.hasImage != null){
                adapter.add(
                    ChatToImageItem(
                        chatMessage.imageUrl,
                        chatMessage.timestamp.toString(),
                        fromUser!!,
                        this@ChatLogActivity
                    )
                )
                recyclerview_chatlog.scrollToPosition(adapter.itemCount - 1)
            } else{
                adapter.add(
                        ChatToItem(
                                chatMessage.messageTxt,
                                chatMessage.timestamp.toString(),
                                fromUser!!,
                                this@ChatLogActivity
                        )
                )
                recyclerview_chatlog.scrollToPosition(adapter.itemCount - 1)
            }


        } else {

            if (chatMessage.hasImage != null ){
                adapter.add(
                        ChatFromImageItem(
                            chatMessage.imageUrl,
                            chatMessage.timestamp.toString(),
                            ToUser!!,
                            this@ChatLogActivity
                        )
                )
                recyclerview_chatlog.scrollToPosition(adapter.itemCount - 1)
            } else{
                adapter.add(
                        ChatFromItem(
                                chatMessage.messageTxt,
                                chatMessage.timestamp.toString(),
                                ToUser!!,
                                this@ChatLogActivity
                        )

                )
                recyclerview_chatlog.scrollToPosition(adapter.itemCount - 1)
            }

        }
    }

// an example of the items that we add to the adapter

 class ChatToImageItem(val imagekey: String, val timestamp: String, val user: User, val context: Context) :
            Item<GroupieViewHolder>() {
        override fun bind(viewHolder: GroupieViewHolder, position: Int) {

            // load sent image into chat
            val ImageUri = imagekey
            val ImageView = viewHolder.itemView.chat_to_Row_iv
            ImageUtils().loadImage(context, ImageView,
                    Constants.S3_LINK + ImageUri)

            //load user image into chat

            val sdf = java.text.SimpleDateFormat("h:mm a")
            val date = java.util.Date(timestamp.toLong() * 1000)
            val datetxt = sdf.format(date)

            viewHolder.itemView.textView_to_row_image_time.setText("$datetxt")

        }

        override fun getLayout(): Int {
            return R.layout.chat_to_row_with_image
        }


    }
Uploading Images
In order to add profile images and allow image messaging, we need to upload the image files to AWS S3 which is Amazon's cloud storage solution. Once the file has been uploaded we can then use the output filename 'key' together with the AWS S3 link to provide a full URL which glide can then use to load the image.
// uploading a file


 private fun showImageChooser() {
        // An intent for launching the image selection of phone storage.
        val galleryIntent = Intent(
                Intent.ACTION_PICK,
                MediaStore.Images.Media.EXTERNAL_CONTENT_URI
        )
        // Launches the image selection of phone storage using the constant code.
        this.startActivityForResult(galleryIntent, 2)
    }

    //override image chooser

    override fun onActivityResult(requestCode: Int, resultCode: Int, data: Intent?) {
        super.onActivityResult(requestCode, resultCode, data)
        if (resultCode == Activity.RESULT_OK) {
            if (requestCode == 2) {
                if (data != null) {
                    try {

                        // The uri of selected image from phone storage.
                        val uri =  data.data!!

                    } catch (e: IOException) {
                        e.printStackTrace()
                    }
                }
            }
        } else if (resultCode == Activity.RESULT_CANCELED) {
            // A log is printed when user close or cancel the image selection.
            Log.e("Request Cancelled", "Image selection cancelled")
        }
    }


// send file picked from picker for upload and get ImageKey
        val inputstream = this.contentResolver?.openInputStream(uri)

            viewModel.UploadFile(inputstream!!)
            viewModel.getUploadedFileKey().observe(this, androidx.lifecycle.Observer { result -> sendImageMessage(result)

            })

        }

   private fun sendImageMessage(imagekey: String){

        val fromId = fromUser!!.id // current logged in user
        val toId = ToUser?.id


            viewModel.SendImage(imagekey,fromId,toId!!)

            if (fromId != toId){
                adapter.add(
                        ChatToImageItem(
                                imagekey,
                                (System.currentTimeMillis() / 1000).toString(),
                                fromUser!!,
                                this@ChatLogActivity
                        )
                )
                // scroll to bottom
                recyclerview_chatlog.scrollToPosition(adapter.itemCount - 1)
            }


    }

//ViewModel

    fun getUploadedFileKey(): MutableLiveData<String>{
        return repository.getUploadedFileKey()
    }

    fun UploadFile(inputStream: InputStream) {
        viewModelScope.launch {
            repository.UploadFile(inputStream)
        }
    }


// Amplify Database Class

val UploadedFileValue                 : MutableLiveData<String> = MutableLiveData()

   fun uploadFile(exampleInputStream: InputStream) {

            println("Upload: $exampleInputStream")

            val randomNumber = (1000..9999).random()

            exampleInputStream.let {
                Amplify.Storage.uploadInputStream(
                    "UploadedFile" + randomNumber.toString() + ".jpg",
                    it,
                    { result ->

                        UploadedFileValue.setValue(result.key)
                    },
                    { error ->
                        Log.e("MyAmplifyApp", "Upload failed", error)
                        UploadedFileValue.setValue("error")
                    }
                )
            }
    }
Handling Latest Messages and Notifications
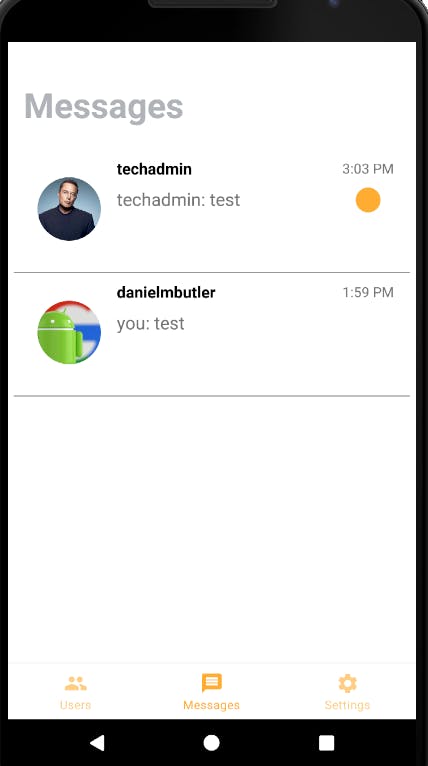
On the main fragment we can see the conversations of the logged-in user, in order to observe for any incoming messages we need to set up a similar listener like before but this time we are listening for objects from the 'Latest Message' Model, the latest message is overwritten with each new message in the conversation so there should only be a one message per conversation.
Once a new message is observed we will then reload the recycler view to show the new message. If the message is also unread then a notification 'bubble' will be displayed on the chat item.
// Activity

   private fun ListenForMessages(){
             // setup latest message listener , for each new message refresh recyclerview
             viewModel.setupLatestMessageListener(User)
             viewModel.getIncomingLatestMessage().observe(viewLifecycleOwner, Observer { message ->
                  viewModel.QueryLatestMessages(User.id)
                 getLatestMessages()
             })

    }

// Auth Class

    fun listenforLatestMessages(user: User){


            Amplify.DataStore.observe(
                LatestMessage::class.java,
                {
                    //if new latestmessage item is sent to current user and is from the user in this row from the latest message model

                    Log.d("DBListner", it.item().toString())
                    if (it.item().toid == user.id ){

                        Log.i("Latest message listener", "Message: ${it.item().messageTxt}")
                        Amplify.DataStore.query(LatestMessage::class.java, Where.matches(
                                LatestMessage.FROMID.eq(it.item().fromid).and(LatestMessage.TOID.eq(it.item().toid))
                                        .or(LatestMessage.TOID.eq(it.item().fromid).and(LatestMessage.FROMID.eq(it.item().toid)))
                        ),
                                { matches ->
                                    matches.forEach { foundmessage ->

                    // handles multiple messages by ensuring we only return the newest message for the conversation and delete
                    old latest messages

                                        if (foundmessage.timestamp < it.item().timestamp){
                                          )
                                            Amplify.DataStore.delete(foundmessage,
                                                    { Log.i("MyAmplifyApp", "deleted a post.") },
                                                    { Log.e("MyAmplifyApp", "Delete failed.", it) }
                                            )
                                        }
                                    }
                                    latestmessage.postValue(it.item())


                                },
                                { e ->
                                    Log.e("MyAmplifyApp", "Query failed.", e)
                                    latestmessage.postValue(it.item())
                                }
                        )

                    }

                },
                { Log.e("DBListner", "Observation failed", it) },
                { Log.i("DBListner", "Observation complete") }

            )
        }

// RecyclerView Adapter

 // setup notification if message is unread

                    if (LatestMessage.readReceipt == "unread"){
                        holder.itemView.user_item_notification.visibility = View.VISIBLE
                    }

//OnClick set LatestMessage Object as read

mAdapter!!.setOnClickListener(object: LatestMessageAdapter.OnClickListener{
            override fun onClick(position: Int, model: User, message: LatestMessage,view: View) {

                if (message.fromid != User.id){
                    if (message.readReceipt == "unread"){
                        GlobalScope.launch(Dispatchers.IO) {
                            viewModel.setLatestMessageAsRead(message)
                        }
                    }
                }

                val parcelableuser = Mapper().UserToLocalUserModel(model)

                LatestMessages = mutableListOf() // setting latestmessage list to null to
                avoid duplicates
                val intent = Intent(requireContext(), ChatLogActivity::class.java)
                intent.putExtra("user", parcelableuser)
                startActivity(intent)

            }

        })
If you have any further questions please check out the full code on my GitHub or reach out on Twitter :)
https://github.com/danielmbutler/AWS_Android_Messenger_App https://twitter.com/DBTechProjects
Resources
https://github.com/lisawray/groupie - Groupie ViewHolder https://www.youtube.com/watch?v=ihJGxFu2u9Q - Firebase Project which provided my initial inspiration. https://docs.amplify.aws/lib/project-setup/prereq/q/platform/android - Amplify Android Docs
